Nathan's Point


A modern-era proto-freelance H0 scale layout with a NSW terminal and regional theme.

The layout is a point-to-point design with the open staging yard being the main yard (Jonestown) of the layout and comprising of a basic loco facility, intermodal terminal, grain receival terminal and a passenger station.

From the yard, the mainline (or in this case the branchline) operates through a grain loading town (Heidiville) and then continues onto the terminus town (Nathans Point) which is also a grain town and includes a regional intermodal terminal, passenger station, and small steel distribution centre.

There is no hidden staging, with all trains operating with an on-layout purpose.

Follow along as the layout finally gets closer to reality during 2018 and 2019!


Wednesday, November 10, 2021

Making Pulpwood Loads

I have been making pulpwood loads for about 10 years now I guess you could say.  I made quite a few 10 years ago and have been busy making more in recent weeks.  In between, well, I didn't make any! 

The loads are designed to simulate standard 8ft pulpwood logs that run in the US to paper and pulp mills.  Wisconsin Central ran quite a few of these so they fit into my prototype.

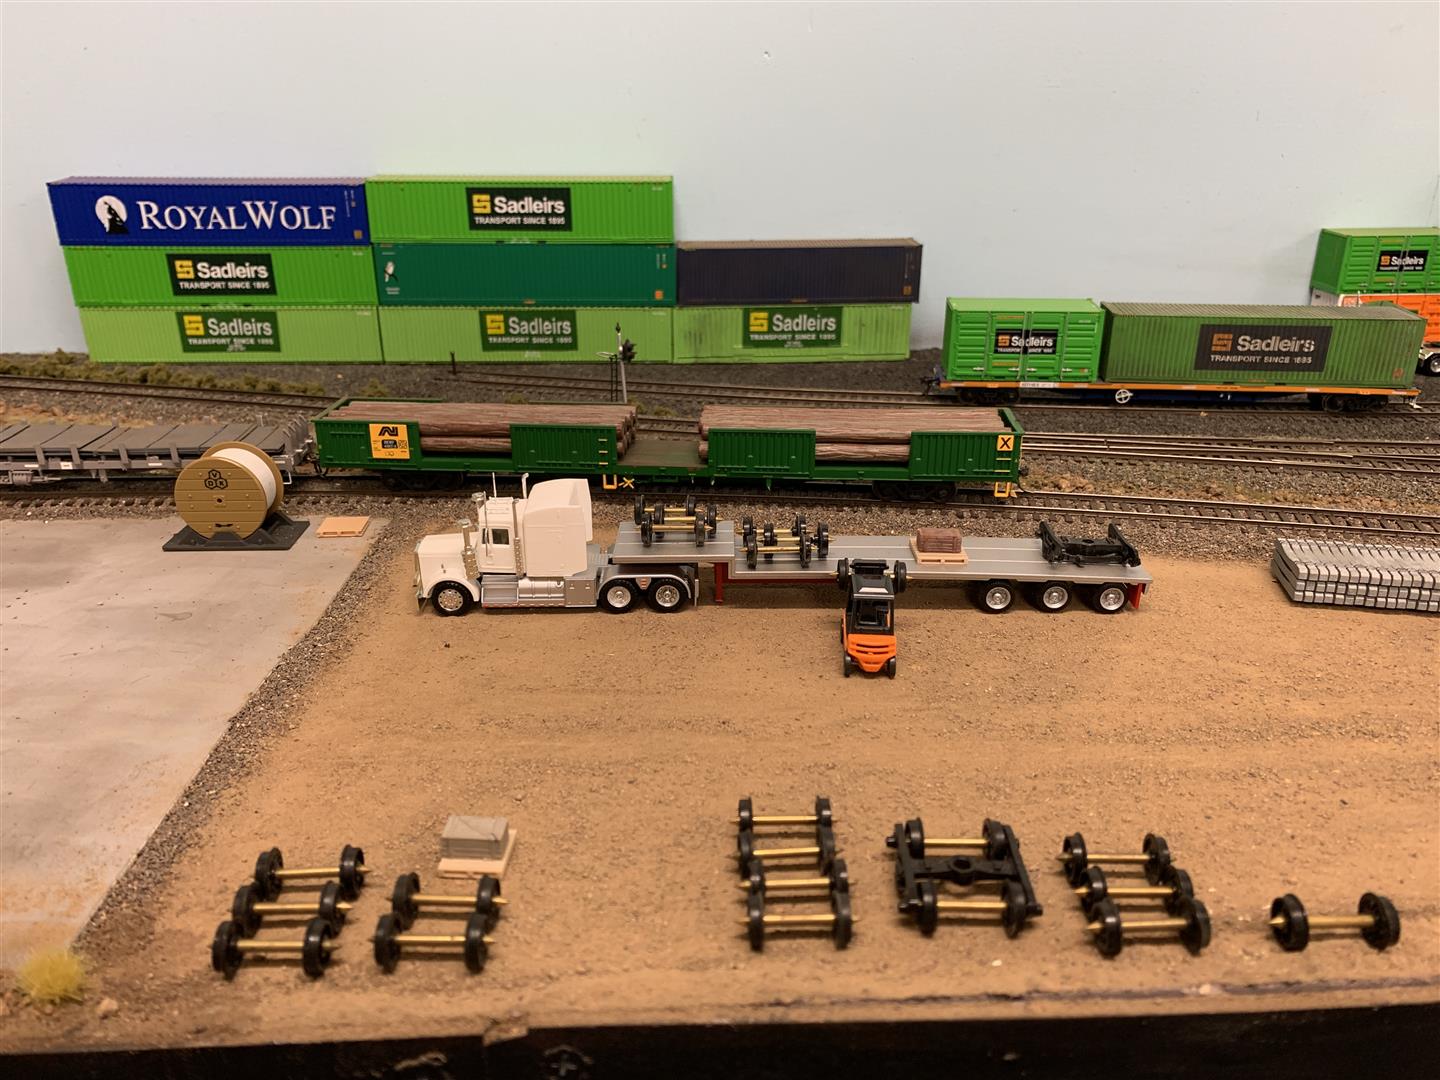
A couple of examples of pulpwood loads.  Between the bulkhead flats and gons, operations are pretty well covered.  Above are a few of the finished models.  On the gondola a piece of pine sits inside to bulk out the space and logs are glued above where you can see.

I have used an Australian plant, Pittosporum, which is very common for hedging in gardens in eastern Australia.  I have used thin branches from a variety I bushes and small trees that have been in my gardens.  The secret is to get into the middle of the bush and to look for straight branches which are a bit bigger than toothpick diameter.  The straightest branches are usually the ones that have grown up after pruning has occurred.  I recently did a heavy prune on a long hedge and found a lot of good fodder in the middle which was now bear.  

I have a basic jig for some standard length cuts like 40ft.  Here is my 8ft jig and a pair of garden secateurs.  I just dock long straight twigs into 8ft lengths.  I can sometimes get 8 or so out of one length and other times I struggle to get two or more due to offshoots or bending. 

After 15 minutes of cutting I have good stock.

I use pine DAR from Bunnings.  This is 42x19mm.  For a gondola I use a single piece and foe a bulkhead flat, I stand two pieces up and glue them.  Just double check the width with your wagon as this recent lot I did was too wide so put the saw through them and re-glued them to take off a few mm.  I paint them dark brown before gluing sticks to them.

I use my finger to spread a layer of glue on one side and then start to lay out the sticks and bunch them up.  Once dried, I do the other side, and then the top.  I have found that a single layer of straight sticks will give a very good sense of a bulk load and doesn't use 'a million' sticks to make either.  I made a full load the other day in about 10 minutes per side.  


A couple of examples of the loads.

A few loads in gondolas as well.  These ones have H beam stakes at the ends.  Some just use logs uprighted as in the first photo.

These look great and are pretty easy and quick to make. 

Enjoy!


Saturday, November 6, 2021

Waybill Operations

Waybill operations make layout operation purposeful and for my mind, enjoyable too.  Waybills give freight cars a reason to be on the layout, and with a bit of planning, you can run a railway similar to the real thing.  

A couple of  months back I planned all the cars I wanted on the layout without having too many, and made sure they aligned with the proposed operations and industries.  

Once all that was worked out, I needed to fill in the Car-Cards and the waybills.  I basically did an excel spreadsheet with every freight car on it, and what its move would be in and out of staging (set as Chicago and Twin Cities)and what town or industry it would go to on the layout.  

I have operated a 'full-day' of train running which takes about 3-5 hours non stop for one person (but I would do it over a period of a few days) and everything seemed to run smoothly.

The photos below show the set up of the car cards with every wagon in Jonestown Yard.  

Subsequent to this all happening, I have ripped up the middle of the layout to put in a large lower deck staging yard for more staging and improved operations (and more run-through trains).  More on this in another post!

Enjoy!


Thursday, November 4, 2021

More Photos

Some more recent layout photos on the WC. 

An SD45 departs Jonestown Yard, rolling past the intermodal terminal.

The loco depot with plenty of '40 and '45 power.

Must be no trains running today?  Probably a Sunday at the depot.  

Single SD45 rounds 'the knob' on approach to Heidiville.

Enjoy!

Tuesday, November 2, 2021

Layout Photos

Nathan's Point is currently running as 1990s Wisconsin Central.  This modelling interest stems back from the early 2000s when US models such as Kato and Atlas were excellent models at a good price, and as such, I accumulated a pretty big US collection before Auscision models really started to produce a wide variety of modern era Aussie models. 

The thing I love about the US outline is the manifest freights and variety of freight cars.  Modern Aussie prototypes are more about block trains although I have tinkered with that concept by having a lot of Steellink operations and small depots.  

I have also been going through my box of decoders from 10 years ago and have started fitting them to the locos.  Most of them were Soundtraxx KT-1000 type drop in decoders which were pretty easy.  I also did a basic decoder install into a Blue Box SW1500.  With the amount of reference material and videos on the internet now, it is pretty easy to research anything and have a crack at it.  The SW1500 was a bit of fun and it is great to have a loco running that I always thought would be static display or a 'slug' with no motor or gears in it.  

Enjoy the shot

Chris 


A couple of WC freights waiting to depart Jonestown Junction.

SW1500, WC1562 now with a decoder fitted.

WC1562 with the lid off going for a test run.

WC1562 on the bench.  The motor needed to come out to be isolated from the frame.  Surprisingly it all went back together.

The loco depot end of the main yard at Jonestown.  The yard is 6 tracks, each handling around 3.7m of train (about 18 cars).  The two Athearn SW1500s are the yard switchers.  The frogs in the yard are powered by Tam Valley Hex Juicers, and some of the other manual points just have a DPDT slide switch which routes power.  

Down the exit end of the yard shows a few trains ready to depart.  On the Loop is 1237 with two boxcars for a local industry.  A pair of SD40s sit on track 1 with a Chicago bound freight.  Track 5 is the local turn for the paper mill at Wisconsin Rapids with a handsome F45 leading, and track 6 is a bulk grain consist with a stock standard pair of SD45s.  

The same again but from the chopper!  You can see the basic set up with waybill boxes and NCE throttles.  The Yard has two PCPs for plug in operations as not all my throttles are wifi, but generally mainline ops are wifi control.  


A very full loco depot.  The shed needs a roof and I need to add a sanding tower over the track as well.  The units in this photo are from Atlas, Athearn, Proto2000, Kato, and an Overland caboose in the shed.

Enjoy!

Sunday, August 29, 2021

Calling On Signal

I have quite a few signals around the layout, with some of them simply indicating the route direction with power coming from the Tortoise, and then quite a few which are independently controlled at a control panel for the train controller to operate (but the turnout control is at the turnout).

I saw on Australian Modeller some of the Hand Made Accessory signals with Calling on lights.  These are little orange lights which allow passing a signal at STOP to enter a loop or dead end.  I thought these might be a bit of fun and well suited to a few locations.  

The first install was at Aylmerton Junction which is a single mainline location with two turnouts going to two different staging locations.  

The first change I made was to set the turnouts up as a pair.  This meant that you either have a through road or you don't.  Makes it easier for giving a green signal for a clear road rather than trying to ensure two turnouts are set correctly.  

At this point I should add that I am powering the Tortoises and signals all of 12V DC.  My electrical skills are pretty basic, but I can generally work out what I want with a bit of fiddling.

Anyway, I wanted the signals to give the route indication, but I also wanted a manual ability to request the Calling On indication to go into staging.  

What I came up with is the use of a 12mm LED momentary push button to allow the crew to get the Calling On.  This means they need to be at the Signal and need to confirm the road is clear ahead before proceeding.  

Here are some photos and my how to:


Wiring up the 4 pin 12V LED push button.   12V pos and neg power the LED and then the calling on wire and 12V neg go to the other two pins.  This was easier to work out than I expected.  The light stays on at the switch all the time which is helpful too.

Here is Aylmerton Junction. The road is set for the two staging tracks.  The left track has the green which is automatically given due to the polarity of the Tortoise.  The main line is red, also due to the polarity of the Tortoise.  

When pushing and holding the button, the Calling On orange light appears for the train to leave the main for the staging track.  This allows the train to stay on the main if they do not need to go to staging.  

My finger pushing the button.  Sorry about the giant Dymo and coffee cup.  As you can see, I have my Wisconsin Central stuff running around at the moment.

The finished product, with the lit LED and a small label identifying what it does.  There are 5 other locations where I will be putting these.  I wired up the switches today.  Just need more signals!

Enjoy!


Monday, November 23, 2020

Layout Update

Apologies for the long time between posts, but when I have had a moment, I have been working on the layout.  Here are some wrap up photos for 2020.  

I have a few scenic industries to work on and complete, plus a tidy up of some of the structures (or new structures).